1/68

Augmented Reality App Development

Prof. Dr. Ansgar Gerlicher

Stuttgart Media University

Stuttgart, Germany

2/68

Agenda

  1. General Intro to AR
  2. ARKit Overview
  3. Basics on using ARKit
    • World Tracking / Plane detection
    • Image Detection
    • Object Detection
  4. Assignments - hands-on AR apps
3/68

General Intro

4/68

Gartner Hype Cycle 2018

center 60% Source: Gartner

5/68

Short AR History

40% 40%

Source: wikipedia

6/68

Definition of Augmented Reality

What is the difference between:

7/68

AR or what?

center 20%

8/68

AR or what?

center 60%

9/68

AR or what?

center 60%

Youtube: Zombies, Run!

10/68

What is Augmented Reality?

11/68

AR Use-Cases

  • Retail
  • Games and Entertainment
  • Navigation
  • Marketing
  • Military
  • Industry
  • Printmedia
  • Medicine, e.g. surgery
50%
12/68

Example Retail

center 60% AR in Retail - Stuttgart Media University, Semesterproject Winterterm 2017-18

13/68

Example Entertainment

center 60% AR in Entertainment - Stuttgart Media University, Semesterproject Winterterm 2017-18

14/68

Example Automotive

center 40% AR in Automotive Example - Playspace, project in cooperation with University of Swinburne / Daimler / gerenwa

15/68

New: Visual Positiontioning System (VPS)

center 40% Youtube: VPS Google I/O 2018

16/68

Future AR?: Hyper-Reality

center 40% Vimeo: Hyper-Reality by Keiichi Matsuda

17/68

AR vs. VR. MR

center 80% Source: Microsoft

18/68

Virtual Reality

center 80% Youtube: VR Coastiality

19/68

Mixed Reality

center 80% Youtube: Microsoft MR

20/68

Mixed Reality Spectrum

center 80% Source: Microsoft

21/68

Hardware Requirements for AR apps

22/68

Examples for AR capable smartphones

23/68

Example AR Glasses

center 80%

Source: tomsguide

24/68

Future AR Hardware

center 100%

25/68

AR Software Requirements

  1. Understand the environment as good as possible meaning
    • Track objects and the location, movements of objects and the device, understand light conditions. Locate the position and orientation of the device (smartphone or glass) in relation to the surroundings
  2. Render objects so the blend in with the environment based on the environmental understanding
    • They are correct in position and size, no overlapping with real objects and the lighting is rendered correctly
26/68

AR Frameworks

27/68

Framework Functionalities

28/68

Marker Tracking

center 60%

29/68

Image Tracking

  • Aka Natural Feature Tracking
  • Recognizing natural features in video images (U. Neumann, S. You, 1999)
  • Images are easier to recognize, if they have a high contrast and many features to detect and their size in the real world is known
50%
30/68

3D Rendering

center 60%

31/68

Camera, Viewport, Field of View

center 60%

32/68

Multi Targets

center 60%

33/68

Text Recognition

center 60%

34/68

Object Tracking

35/68

Location Tracking

36/68

Light Estimation

center 60%

37/68

Binaural Sound

center 60%

38/68

SLAM

39/68

Motion Tracking

center 60%

40/68

Understanding the Environment

center 60%

41/68

Masking Virtual Objects

center 60%

Youtube: masking objects ARKit 3 People Occlusion / Masking Feature

42/68

Interacting with the Environment

center 60%

43/68

3D Reconstruction

center 80%

Youtube: 3D reconstruction

44/68

Semantic Scene Understanding

center 80%

Youtube: Semantic Scene Understanding

45/68

Processing Pipeline

center 60%

46/68

ARKit overview

Apple presented the ARKit frameworks since iOS 11 on WWDC 2017. Since September 2018 the new version ARKit 2.0 was released with iOS 12. It provides an API to develop AR applications that allow you to augment the camera view and place virtual 3D object within the real world using your iOS device as a window to see them.

47/68

ARKit Agenda

You will learn how to create your own AR app that can:

48/68

Assignment 1 - First AR app

Let’s jump right in an create a first AR app in Xcode:

Assignment 1 - First AR App

49/68

Assignment 2 - Using QuickLook API and creating USDZ files

The Quick Look API is a very easy way to get a nice AR impression. Let’s try it:

Assignment 2 - Placing AR Objects using QuickLook

50/68

Important basic classes and protocols in ARKit

No that we’ve created our own first two AR apps (that was easy right), let’s try to get a better understanding of the most important ARKit classes used:

On the next few slides we will use these classes and protocols to:

51/68

Detecting Planes with ARKit

In order to detect planes you need to first create an ARSession and configure it using an ARConfiguration object. For the configuration use the ARWorldTrackinConfiguration class and turn on the plane detection as shown here:

let configuration = ARWorldTrackingConfiguration()
configuration.planeDetection = [.horizontal, .vertical]

Next create an ARSCNView (if not already available) and configure it using the configuration object:

let sceneView = ARSCNView()
sceneView.session.run(configuration)

Now your scene view is configured to detect horizontal and vertical planes in the real world.

52/68

Using ARSCNViewDelegate to receive information on detected planes

In order to be notified by ARKit if a plane was detected, your ViewController should implement the following method:

 func renderer(_ renderer: SCNSceneRenderer, didAdd node: SCNNode, for anchor: ARAnchor) {
       
    }

This method tells the delegate that a SceneKit node corresponding to a new AR anchor has been added to the scene. It is called whenever ARKit detects a new plane. The plane is added as node at the anchor position. The parameters are:

53/68

Rendering a detected plane in the AR Scene

Within the “renderer” callback method we can use the provided information to visualize the detected planes. For this a SCNPlane class can be used. The following code shows how the SCNPlane class is created based on the information from the ARAnchor:

 guard let planeAnchor = anchor as? ARPlaneAnchor else { return }
 let extentPlane: SCNPlane = SCNPlane(width: CGFloat(planeAnchor.extent.x), height: CGFloat(planeAnchor.extent.z))

First we cast the ARAnchor to an ARPlaneAnchor in order to get information on it’s extend. Then we create the SCNPlane using the extend as width and height for the new object. A SCNPlane represents a rectangle with controllable width and height. The plane has one visible side.

In order to render a 3D object in the scene we need to create a SCNNode. This can be done as follows:

let extentNode = SCNNode(geometry: extentPlane) 
// position the node
extentNode.simdPosition = planeAnchor.center

// `SCNPlane` is vertically oriented in its local coordinate space, so
// rotate it to match the orientation of `ARPlaneAnchor`.
extentNode.eulerAngles.x = -.pi / 2
// Make the visualization semitransparent
extentNode.opacity = 0.3
// add the node to the scene
node.addChildNode(extentNode)
54/68

Detecting touches and use the ARHitTestResult to place objects in the scene

In order to detect touches on a View the touchesBegan() method can be overridden. To find out which object was touched in the 3D scene, the hitTest() of ARSCNView can be used. It allows to find a hit with different types of objects in a scene, such as feature points and planes. The following code shows how an extisting plane can be ‘hit tested’:

override func touchesBegan(_ touches: Set<UITouch>, with event: UIEvent?) {
        
        super.touchesBegan(touches, with: event)
        guard let touch = touches.first else { return }
        let results : [ARHitTestResult] = self.sceneView.hitTest(touch.location(in: self.sceneView), types: [.existingPlaneUsingExtent])
        guard let hitResult = results.last else { return }
        // let's show our model in the scene    
        self.renderSomethingHere(hitFeature: hitResult)
}

The hitTest() method returns an array of ARHitTestResult objects. In the above example it is tested, if the location of a touch on the view would “hit” an existing plane with an extend (a size) in the world context.

55/68

Rendering something at the location of the hitResult

To render a node in the 3D scene based on the found hit location, it is necessary to retrieve the position and orientation of the hit test result relative to the world coordinate system. This is done by using the property worldTransform.

This is a transform matrix that indicates the intersection point between the detected surface and the ray that created the hit test result. 
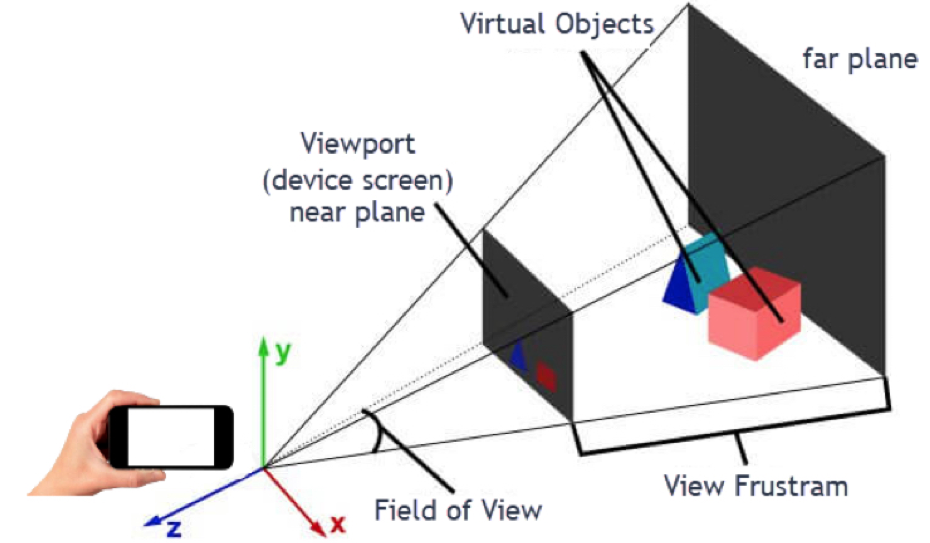
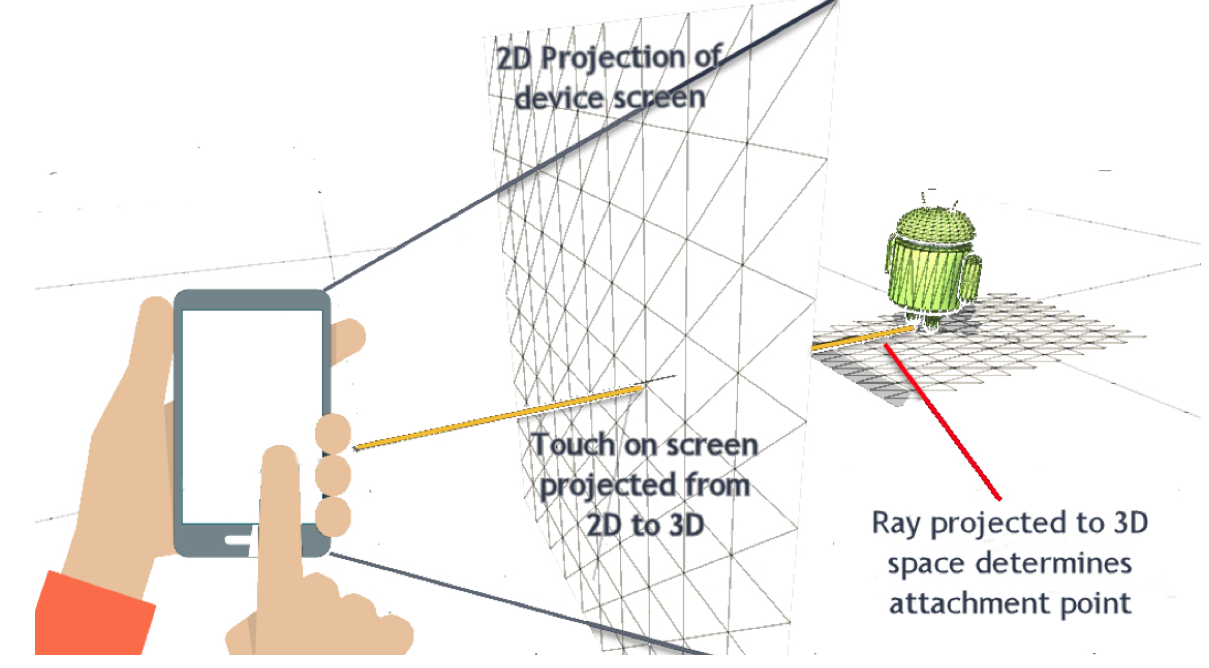
A hit test projects a 2D point in the image or view coordinate system along a ray into the 3D world space and reports results where that line intersects detected surfaces.

In order to translate this into a location within 3D space, x,y,z coordinates are needed. This can be done by using SCNVector3Make as follows:

func renderSomethingHere(hitFeature: ARHitTestResult){
        
        
    let hitTransform = SCNMatrix4(hitFeature.worldTransform)
    // get coordinate for node
    let hitPosition = SCNVector3Make(hitTransform.m41,
                                         hitTransform.m42,
                                         hitTransform.m43)
    //create a clone of an existing node  
    let node = self.someSCNNode!.clone()
    // set the position within 3D space
    node.position = hitPosition
    // add the node to the ARSCNScene
    self.sceneView.scene.rootNode.addChildNode(node)
}

In the above example a SCNnode is cloned, positioned and then added to the scene as child node. Let’s see how the node is created:

56/68

Loading models from an UDSZ file into an SCNNode

As we’ve learned in the second assignment, it is quite easy to load USDZ files as SCNnodes using Quick Look. But without Quick Look, we have to do it by using the class SCNReferenceNode. It though is fairly simple. Here is some example code:

let url = Bundle.main.url(forResource: "Tugboat", withExtension: "usdz")
if let refNode = SCNReferenceNode(url: url!) {
    // the file was found so load the model            
    refNode.load()
    // set our boat variable
    self.boat = refNode
    // scale the boat and make it much smaller
    self.boat?.scale.x = 0.05
    self.boat?.scale.y = 0.05
    self.boat?.scale.z = 0.05
}
57/68

Assignment 3 - Plane Detection and Object Placement

That’s it. You now can use the SCNNode and add it to the scene. Not let’s try it out - hands on:

Assignment 3 - Plane Detection and Placing Objects

58/68

ARKit Image Detection

For the detection and tracking of images, ARKit provides basically two classes:

Images and their movements are tracked and objects can be placed relative to the tracked position of those images.

59/68

Configuring Image Detection

To enable image detection the following steps are necessary:

  1. Load one or more ARReferenceImage resources from your app’s asset catalog.
  2. Create a world-tracking configuration and pass those reference images to its detectionImages property.
  3. Use the run(_:options:) method to run a session with your configuration.

The code below shows how to execute these steps when starting or restarting the AR experience

let configuration = ARImageTrackingConfiguration()
        
guard let trackedImages = ARReferenceImage.referenceImages(inGroupNamed: "Photos", bundle: Bundle.main) else {
    print("No images available")
    return
}
        
configuration.trackingImages = trackedImages
configuration.maximumNumberOfTrackedImages = 1
// Run the view's session
sceneView.session.run(configuration)
60/68

Visualize Image Detection Results

When one of the reference images is detected, the session automatically adds a corresponding ARImageAnchor to its list of anchors. Implement for example the renderer(_:didAdd:for:) method for reacting on a image detection as follows:

func renderer(_ renderer: SCNSceneRenderer, didAdd node: SCNNode, for anchor: ARAnchor) {
        
        
    let shipScene = SCNScene(named: "art.scnassets/ship.scn")!
    let shipNode = shipScene.rootNode.childNodes.first!
        
    shipNode.eulerAngles.x = -.pi / 2
    node.addChildNode(shipNode)
        
}
61/68

Position an object on the detected image

To use the detected image as a trigger for AR content, you’ll need to know its position and orientation, its size, and which reference image it is. The anchor’s inherited transform property provides position and orientation, and its referenceImage property tells you which ARReferenceImage object was detected. If your AR content depends on the extent of the image in the scene, you can then use the reference image’s physicalSize to set up your content, as shown in the code below.

guard let imageAnchor = anchor as? ARImageAnchor else { return }
let referenceImage = imageAnchor.referenceImage
    
// Create a plane to visualize the initial position of the detected image.
let plane = SCNPlane(width: referenceImage.physicalSize.width, height: referenceImage.physicalSize.height)
let planeNode = SCNNode(geometry: plane)
planeNode.opacity = 0.25
    
//rotate the plane to match.
planeNode.eulerAngles.x = -.pi / 2
    
// Add the plane visualization to the scene.
node.addChildNode(planeNode)
62/68

Provide Your Own Reference Images

You can provide your own images as a reference. This is done by creating an AR resource group in your Assets and then adding the image files (jpg or png) via drag an drop. The following things should be considered:

Xcode will warn you if the image quality is not good enough, when you add an image.

For each session you should load one resource group. Apple recommends not to use more than 25 images in on session for performance reasons. If you want to use more images in your app that is possible, but you should load another resource group for example dependant on the context or location.

63/68

Assignment 4 - Image Tracking

Now you should have enough information to develop your own AR image tracking app. Have fun!

Assignment 4 - Image Tracking

64/68

ARKit Object Tracking

With iOS 12 Apple supports also 3D object detection. In order to detect objects the following steps are necessary

The rest is the same as with detecting images. Here is some example code to do the setup:

let configuration = ARWorldTrackingConfiguration()
guard let referenceObjects = ARReferenceObject.referenceObjects(inGroupNamed: "gallery", bundle: nil) else {
    fatalError("Missing expected asset catalog resources.")
}
configuration.detectionObjects = referenceObjects
sceneView.session.run(configuration)

When ARKit detects one a reference object, the session automatically adds a corresponding ARObjectAnchor to its list of anchors

65/68

Creating ARKit ReferenceObjects for tracking

Objects are created by using the app provided by Apple here. But it is also possible to scan objects in your own app. This is done by using the ARObjectScanningConfiguration class. Here is some example code:

let configuration = ARObjectScanningConfiguration()
configuration.planeDetection = .horizontal
sceneView.session.run(configuration, options: .resetTracking)

After scanning, call createReferenceObject() method and export or use the scanned object.

More information about this process can be found here

66/68

Assignment 5 - Object detection

Now let’s try scanning and detecting objects with ARKit:

Assignment 5 - Object Detection

67/68

Assignment 6 - Bonus for the quick

This was all to easy and you are bored? Go on and try out Apples example game…and maybe you can create your own version of it!

Bonus: Assignment 6 - Build, Run and Play around with Apples SwiftShot Game

68/68

References

ARKit Documentation